Your Whole New Supply Chain For Cooling & AC Parts
Your Whole New Supply Chain For Cooling & AC Parts
Views: 0 Author: Site Editor Publish Time: 2026-11-19 Origin: Site
To match a commercial vehicle AC condenser, confirm three things separately: the installed HVAC system, the complete assembly being supplied, and the conditions under which it must reject heat. Core width and height are only two fields in that record. A condenser can fit the opening yet have the wrong ports, drier arrangement, fan controls or mounting geometry.
For a replacement order, begin with the removed unit's label and the vehicle or HVAC manufacturer's parts information. Then compare a dimensioned drawing, connection photographs and an explicit bill of materials. Approve the sample only after unresolved differences have been closed. This sequence is useful for distributors, fleet workshops and buyers handling buses, trucks and specialty bodies.
A chassis model and production year may identify the vehicle without identifying its air-conditioning equipment. Record the body builder, HVAC manufacturer, unit model, serial number and installation location where those details are available. A bus, ambulance or converted commercial vehicle may carry equipment selected during body construction or conversion.
Keep the evidence in separate fields rather than combining every number into one “OE number” column:
Evidence | What to record | How to use it |
|---|---|---|
Vehicle identity | VIN or chassis, build date, powertrain and original sales market | Locate the applicable vehicle parts and service information |
Body and HVAC identity | Body builder; installed HVAC model, serial and configuration | Identify equipment that a chassis-only search may miss |
Removed condenser | Complete label number, supplier number, revision and clear photographs | Find a candidate replacement and disclose later substitutions |
Refrigerant circuit | Specified refrigerant, drier arrangement, service ports and connected components | Check compatibility against the installed system |
Installation | Front cooling pack, roof, skirt, underbody or other remote location | Define mounting, airflow, hose routing and access requirements |
A label photograph identifies a useful starting point; it does not prove that a previous owner fitted the correct assembly. If the label conflicts with the HVAC parts list or installed connections, resolve that conflict before using the old unit as the purchasing standard.
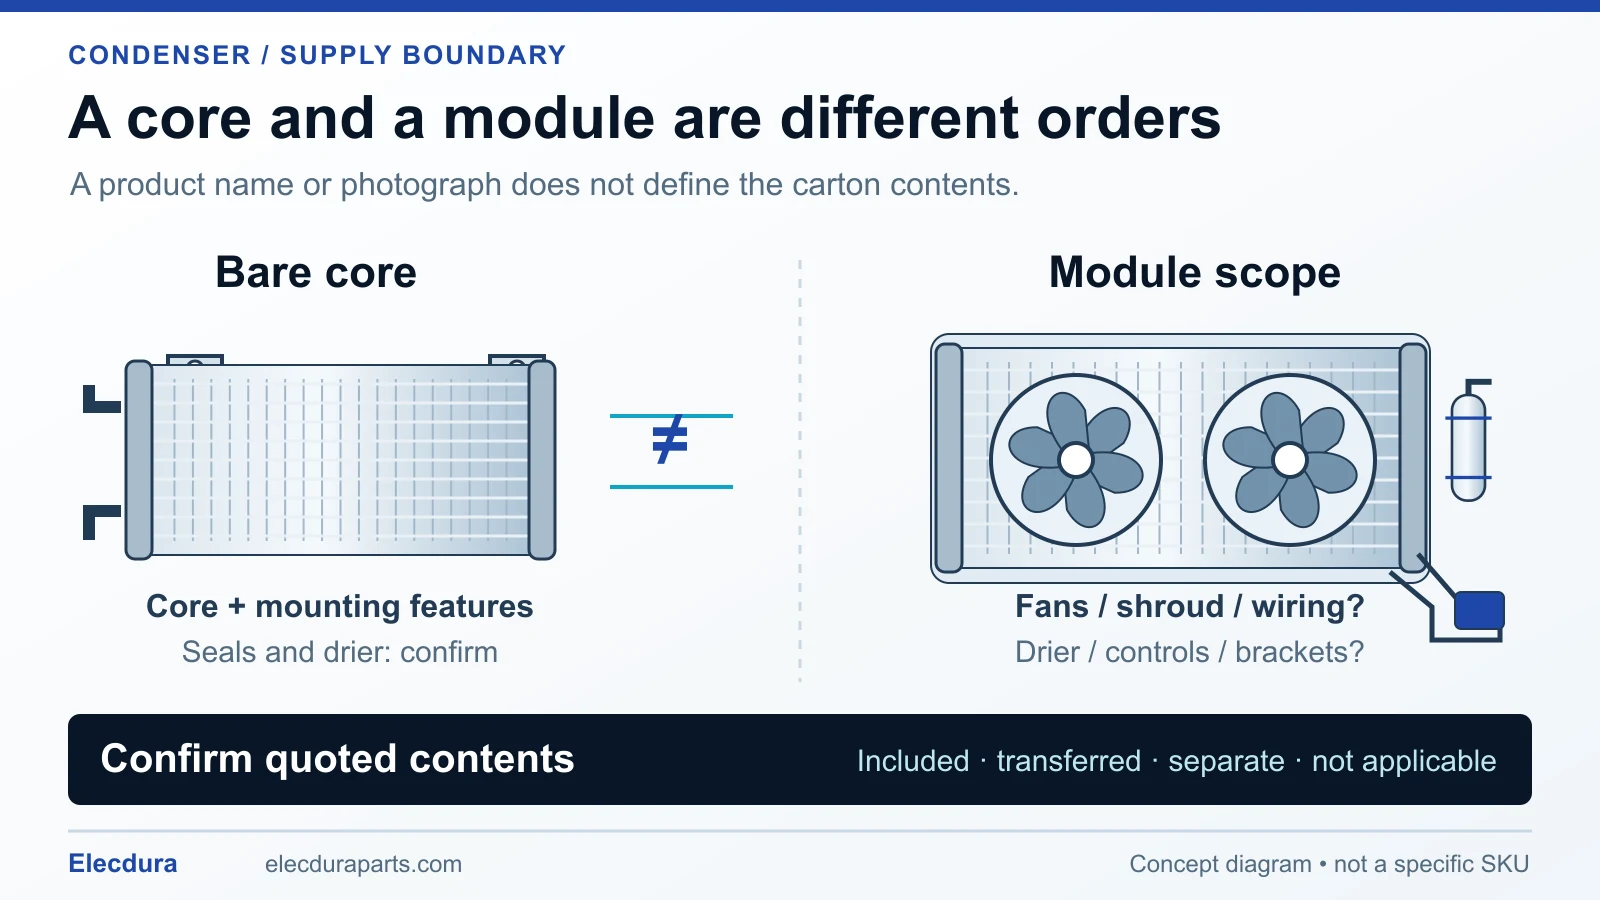
Compare the same supply boundary: identify included parts, transferred parts, separate items and anything not applicable.
“Condenser” can mean a bare heat exchanger, a condenser with an integrated receiver-drier, or a module containing fans, shroud, brackets, wiring and controls. Two quotations can therefore name the same application while supplying different contents.
For a real example of this distinction, Bergstrom's C2SC bus condenser sheet lists a coil, fans, receiver-drier, fittings and a pressure switch, and identifies the intended mounting position. It also states that installed performance depends on configuration and components. This documents one manufacturer's module; it is not a universal kit specification or an interchange reference.
Quoted scope | Confirm explicitly | Possible extra work |
|---|---|---|
Bare condenser | Ports, brackets, drier provision and included seals | Retaining compatible existing fans, guards or mounting hardware |
Condenser with drier | Drier housing, cartridge serviceability, caps and fittings | Confirming the original circuit and replacement service procedure |
Complete module | Core, fans, shroud, wiring, controls, brackets and guards | Checking vehicle electrical interfaces and the complete installed envelope |
Ask the supplier to mark every item as included, transferred from the old assembly, supplied separately or not applicable. An unmarked accessory should not be assumed to arrive in the carton.
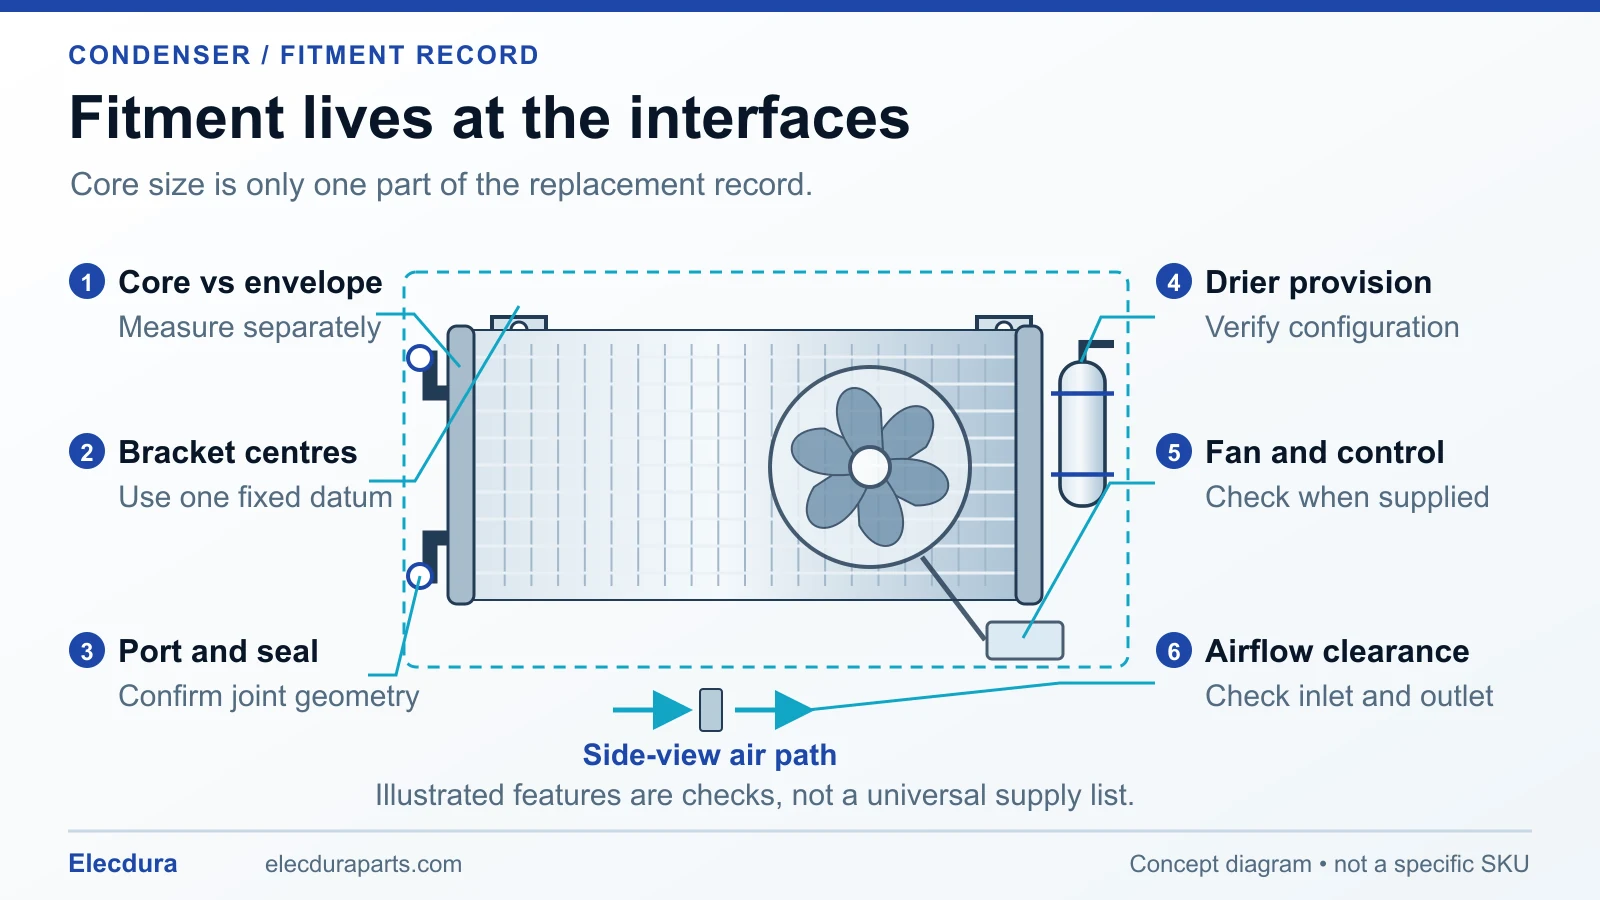
Use a fixed orientation and separate core dimensions from the full installed assembly. Shown features are checks, not a universal contents list.
Choose a repeatable viewing direction, such as the installed air-inlet face, and mark it on the drawing. Identify top, bottom and vehicle-facing side. Photograph both faces, both ends, brackets, connections and the label, with a scale where useful. This prevents a mirrored photograph from making reversed ports appear correct.
Measure the finned heat-transfer area separately from tanks, headers, drier, connection blocks and mounting tabs. State the units and identify the drawing datum. Overall width and height must include projecting fittings; overall depth must include the fan motor, shroud and electrical connector when these are supplied.
Record core width, height and thickness, and the maximum overall envelope.
Measure bracket-hole centres, offsets, hole or slot shape, isolators and installed orientation.
Locate inlet and outlet centre lines from the same datum, including their forward or rearward projection.
Check clearance for fan blades, body panels, guards, hose bend radius and removal of service parts.
Do not turn an approximate tape measurement into an invented production tolerance. Identify critical dimensions on the supplier drawing and agree their acceptable limits before sample approval.
Record whether each connection is a threaded fitting, flange, block joint or another specified type. Check thread or bolt pattern, sealing face, O-ring groove, locating features and pipe direction. A connection that can be bolted together may still have the wrong seal geometry or impose side load on the header.
For example, if a candidate has the same core size but a differently angled outlet, ask for a revised drawing comparison. Do not approve it on the assumption that the existing pipe can be bent into place. The relevant checks are free alignment, seal seating, hose clearance and the approved vehicle installation procedure. Elecdura's guide to condenser tube-to-header leak evidence explains why mounting and connection loads matter when investigating repeat failures.
Identify whether the circuit uses a separate receiver-drier or a drier incorporated into the condenser. For an integrated arrangement, establish whether the supplied assembly contains a replaceable cartridge, which service parts are included, and what the application requires during replacement. A cartridge and its housing are different items.
Also record switch or sensor provisions, service fittings and the specified refrigerant. Do not change from an integrated to a remote drier merely because a different core is easier to obtain; that changes the circuit layout and needs application-specific approval.
DENSO's condenser installation guide directs technicians to use the vehicle repair manual, protect open connections immediately and follow specified tightening torques. It also calls for attention to tube-connection O-rings and, where a separate drier or accumulator is fitted, keeping it protected until installation. The practical buying implication is to confirm the required seals and moisture-control parts before the vehicle is dismantled. Oil type and replacement quantity must come from the applicable service information, not a universal allowance attached to a quotation.
When fans are included, obtain their part numbers, rated supply voltage, connector arrangement, polarity information and control requirements from the assembly documentation. Include the number of fans, wiring harness and any external relay or controller. Pin count alone does not identify the function of each wire.
For an electronically controlled fan, establish the specified command interface and fail-safe behaviour before assuming it will work with the vehicle harness. A two-wire motor, a fan with an integrated controller and a module requiring an external controller should not be treated as equivalent simply because their housings fit.
Confirm the intended air direction through the installed core and the fan's position relative to it. A spinning fan is not sufficient proof of correct airflow. When considering a separate replacement from the condenser fan range, use the original fan label and wiring information as well as dimensions.
Record inlet and outlet clearances, shroud condition, gaps around the core and nearby heat sources. The air needs a clear route through the heat exchanger and out of the enclosure. A guard, body panel or accumulated debris can change that route even when the new condenser itself is correct.
For roof installations, check approved support, weather sealing, drainage and service access. For skirt or underbody installations, record exposure to road spray, stones, mud and any protective cover. These locations cannot be exchanged as a simple bolt-on assumption. The HVAC and body documentation must define the installation.
DENSO includes radiator cleanliness and cooling-fan operation in its condenser replacement checks. Its compressor troubleshooting chart also associates poor fan suction and dirty condenser or radiator fins with abnormally high discharge pressure. A purchase specification should therefore identify the air-moving components being retained and the faults that must be corrected alongside the condenser.
A capacity number without its rating conditions is not a reliable basis for selecting an alternative design. Ask whether the quoted figure refers to condenser heat rejection or to the cooling capacity of a complete AC system. Those descriptions are not interchangeable.
If a supplier proposes an alternative core or module, request the applicable performance evidence and its test conditions: refrigerant, inlet-air temperature, airflow or fan operating state, refrigerant-side conditions and the configuration tested. Record the units. Compare candidates at the same relevant operating point, or ask the supplier to explain why its data applies to your installation.
A maximum airflow figure alone does not establish airflow through the vehicle's fitted core, guards and enclosure. Equally, a wider or thicker core is not automatically an upgrade. Where no comparable performance evidence or application approval is available, keep the alternative marked “not yet approved” rather than converting a dimensional match into a capacity claim.
Compare vehicle and HVAC identity, exact part number and revision, dimensions, ports, drier arrangement, electrical interface and included components. List each difference from the removed unit or approved specification. Obtain a written resolution for every difference that affects installation or operation.
Before opening protective caps, record the carton, label and lot information. Inspect core and header damage, bent brackets, port protection, sealing faces, fan clearance and connector condition. Compare the contents against the bill of materials. Photograph discrepancies while packaging and transport evidence are still available.
Any leak, pressure, electrical or airflow check needs an agreed procedure, equipment and acceptance limits for that specific assembly. Do not improvise a universal pressure, apply power to unidentified pins or force a sample into misaligned mounts. These actions can damage the part and erase useful evidence.
Have the responsible workshop follow the vehicle and HVAC procedures for installation, leak checks, evacuation, charging and commissioning. Record ambient conditions, fan command and operation, refrigerant charge, system pressures and relevant temperatures against the specified test method. Confirm operation at the conditions the vehicle actually encounters, including stationary operation where required.
A visually acceptable sample is not yet proof of installed performance. Conversely, poor cooling after replacement does not by itself prove a defective condenser. Airflow, electrical supply, charge condition and other circuit faults must be considered through system diagnosis.
Retain the approved part and revision, drawing, photographs, bill of materials, critical dimensions, fan and connector information, drier configuration, packaging details and sample-inspection results. Tie the record to the approved sample or lot. Ask suppliers to disclose changes to the core, ports, brackets, fan, controls or included parts before shipment.
This turns the first sample into an incoming-inspection reference. “Same as last order” is not enough when the last order's drawing and contents were never recorded.
It is a strong starting point when complete and traceable to the correct application. Confirm the installed HVAC system, production or configuration splits, assembly contents and physical interfaces, especially where body-builder equipment or earlier repairs are involved.
Only through an approved system and installation review. Mounting structure, airflow, electrical supply, refrigerant lines, weather protection and service access differ. Similar advertised capacity does not make the locations interchangeable.
That depends on the assembly being ordered and the required repair scope. State each component explicitly in the bill of materials and confirm which existing parts are approved for reuse. Do not infer contents from a representative product photograph.
Send the original label, vehicle and HVAC identity, installed photographs, a dimensioned record, port and drier details, fan and electrical information, required contents, quantity and destination market. Mark unknown fields so the supplier can identify what must be confirmed.
Use the Elecdura wholesale AC condenser inquiry to submit the OE or cross-reference, application and quantity. Add the HVAC label, dimensional drawing and connection photographs when the installed assembly is not identified by the vehicle details alone. Ask for a clearly stated matching basis and included-parts list before approving the order.