English
Views: 0 Author: Site Editor Publish Time: 2026-08-03 Origin: Site
A radiator fan shroud becomes a strong suspect when low-speed cooling deteriorates even though fan command and speed are correct, the heat-exchanger faces are open, and inspection finds a bypass gap, distorted ring, shifting mount, or blade-contact mark. A visible crack alone does not confirm the fault.
Observation | What it suggests | What must still be ruled out |
|---|---|---|
Overheating in traffic but stable temperature at road speed | Insufficient forced airflow at low speed | Weak fan motor, wrong fan command, blocked fins, coolant-flow fault |
A/C warms at idle while fan is operating | Reduced airflow through the condenser-radiator stack | Refrigerant charge, condenser restriction, compressor control |
Repeating scrape or tick that changes with fan speed | Blade-to-shroud or harness contact | Bent blade, bearing play, loose fan hub |
Shroud moves when the motor starts | Broken tab, missing isolator, weak motor-support arm | Distorted radiator support or incorrect installation |
New motor draws high current or fails repeatedly | Mechanical drag or incorrect assembly geometry | Wiring voltage drop, controller failure, incorrect motor |
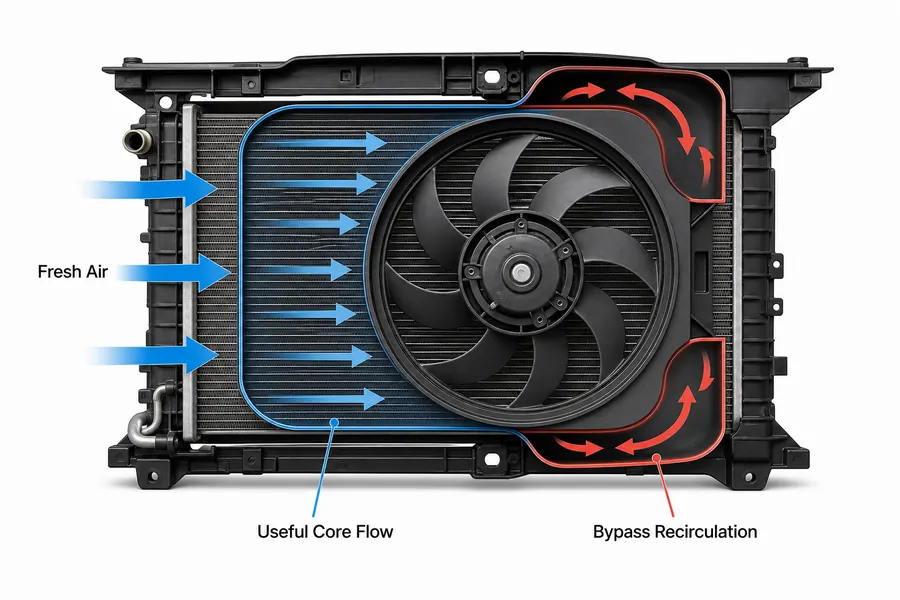
A radiator fan shroud is an airflow component, not merely a plastic guard. It closes the space around the fan so the rotating blades pull air through the A/C condenser and radiator instead of drawing hot engine-compartment air around the edges. When the shroud is cracked, incomplete, distorted, or mounted off-center, the motor can run at normal speed while useful airflow through the heat exchangers falls.
That difference explains why damaged radiator fan shroud symptoms are often misdiagnosed. Overheating at idle may be blamed on the fan motor, radiator, thermostat, or control module. A scraping noise may be blamed on motor bearings even though the blade is touching a displaced ring. Elecdura's radiator cooling fan assembly range demonstrates why the blade, motor, shroud, wiring, resistor, and controller must be matched as an engineered package when supplied together.
An electric cooling fan produces a pressure difference. The engine side of the heat-exchanger stack becomes a lower-pressure area, encouraging outside air to cross the condenser and radiator fins. The shroud expands that low-pressure zone beyond the circular area swept by the blades.
Without a close-fitting shroud, air chooses the easiest route. Some air passes through the core, but some recirculates from the hot rear side of the radiator back toward the blade. The fan may look powerful while moving less fresh air through the fins.
The fan blade normally covers only part of the radiator surface. The shroud acts as a plenum, distributing suction across a wider area. This function matters most during idling, slow traffic, towing at low speed, and stationary A/C operation. At highway speed, ram air can hide a shroud problem.
The circular opening around the blade limits backward air spill. Excessive clearance increases recirculation. Insufficient clearance creates contact risk as plastic expands with heat, the motor support flexes, or the assembly moves over bumps. There is no universal correct gap; the original design and verified application determine it.
The blade must also sit at the intended axial depth. A replacement motor can share the mounting pattern yet position the hub farther forward or rearward. This changes noise and airflow and may bring the blade close to the ring. When considering a motor-only repair, compare the original with the radiator fan motor range, including shaft position and mounting depth rather than connector shape alone.
Radial clearance is the distance between the blade tip and circular ring; it reveals contact risk, off-center mounting, and recirculation around the tip. Axial position describes how far the blade sits into or out of the shroud opening; it affects how the fan develops pressure across the core. Both must be compared with the original design. A fan can have safe radial clearance yet still sit at an inefficient axial depth.
Configuration | What locates the fan | Shroud-related risk | Related fault often confused with it |
|---|---|---|---|
Engine-driven mechanical fan | Engine and water-pump/fan-clutch axis | Engine movement or radiator-stack movement closes clearance | Fan clutch slip, water-pump bearing play, damaged engine mount |
Single electric fan | Motor support molded into the shroud | Cracked support changes blade centering and motor depth | Weak motor, resistor, relay, PWM controller |
Dual electric fan | Two motor supports and a shared frame | One side can distort while the other fan remains normal | Left/right motor or control-stage failure |
Heavy-duty radiator-mounted module | Reinforced frame, brackets, isolators | Vibration, debris, frame movement, and shipment deformation | Fan clutch/control fault or shifted radiator pack |
On a mechanical-fan system, measure clearance with the engine off and consider movement between the powertrain and radiator support. On an electric assembly, focus on molded motor supports, bearing play, blade runout, and controller mounting. A diagnostic instruction written for one configuration should not be copied to the other.
The strongest diagnosis comes from the combination of operating condition, physical evidence, and fan behavior.
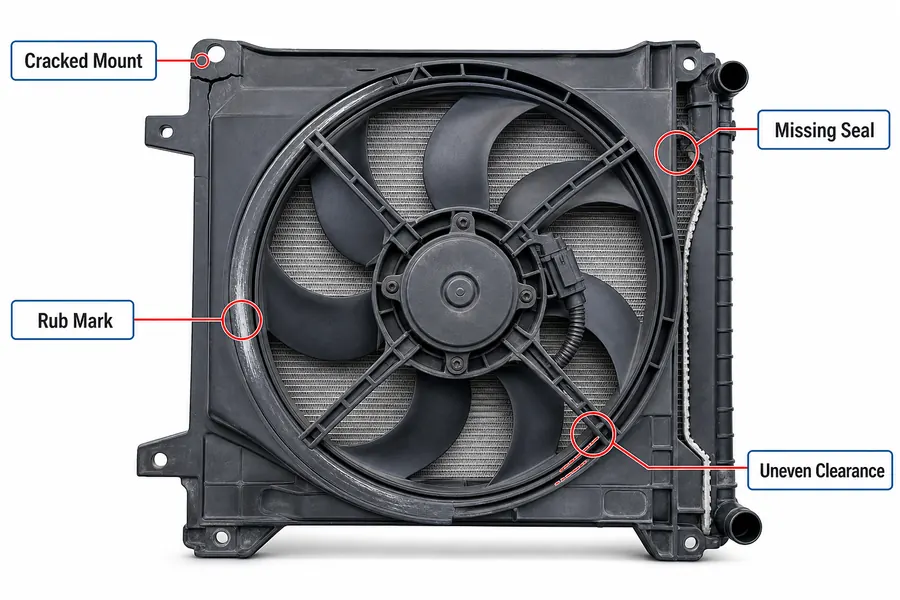
A vehicle that stays cool at road speed but heats up in traffic has an airflow-related pattern. A missing lower section, detached side seal, or open gap lets the fan bypass the radiator core. The pattern does not prove shroud failure, but it justifies a close inspection before replacing electrical parts.
The condenser depends on the same airflow path. Weak suction through the condenser can raise discharge pressure and reduce cooling at idle. Before replacing the A/C condenser, verify fin condition, fan command, fan speed, shroud sealing, and the space between the condenser and radiator.
A tick that follows fan speed can indicate blade contact with the ring, a loose harness, or a broken fragment. Shut the system down before inspection because an electric fan can start unexpectedly. Polished plastic, dust-free arcs, and marks on the blade edge help locate intermittent contact.
Collision force can crack locating pins, distort a radiator support, or move the condenser-radiator stack. The shroud may appear secure at rest but shift during braking or over rough roads. A new fan assembly installed on a distorted carrier can repeat the same interference.
Blade contact increases mechanical load and current draw. A stressed motor may damage connectors or the fan control module. If a replacement motor fails again, inspect the shroud ring, motor support, blade balance, and mounting rigidity instead of treating the second failure as coincidence.
The objective is to determine whether the shroud remains centered, sealed, and rigid enough to control airflow. Disable the fan according to the service procedure before placing hands or tools near the blades.
Inspect the radial arms that carry the motor, the circular ring, molded joints, and reinforcement ribs. Stress whitening in dark plastic often reveals a bend before a crack opens completely. Check whether heat exposure has made the material brittle.
Rotate the blade slowly by hand and observe the full circumference. Clearance that changes during rotation may come from a bent blade, hub runout, bearing play, or an off-center motor mount. Mark the closest point and look for matching wear on the ring.
Do not measure from a flexible outer edge. Use upper hooks, lower locating pins, bolt centers, or other rigid references. Compare left-to-right and top-to-bottom distances. A shroud can be dimensionally correct but still sit incorrectly because the radiator support or heat-exchanger stack has shifted.
Apply light pressure near each mount and watch for a crack opening. Do not force aged plastic. Confirm that rubber isolators, sleeves, clips, spacers, and captive nuts are present. Missing hardware changes both alignment and vibration behavior.
Inspect where the shroud meets the radiator. Foam strips, side seals, lower clips, or close-fitting flanges may prevent air from returning around the core. A small-looking opening can have a large effect because it offers much less resistance than the fin pack.
After all tools are removed, command the fan with an approved scan tool or vehicle-specific procedure. Watch for ring movement, resonance, blade wobble, and harness motion. If the fan does not run or operates at the wrong speed, use a dedicated cooling fan electrical diagnosis rather than confusing an electrical fault with shroud performance.
Visual damage is useful evidence, but the diagnostic question is whether it changes airflow enough to cause the complaint.
Record coolant temperature and A/C performance at idle, during controlled fan activation, and at moderate road speed. Improvement with vehicle speed supports an airflow problem. It does not identify the exact part, so continue with fan-speed and core-condition checks.
Leaves, plastic bags, insects, bent fins, and mud increase resistance. If the core face is blocked, even a perfect shroud cannot pull enough air. Clean only with a method that will not fold the fins. For internal radiator concerns, follow the correct temperature-distribution or flow procedure before selecting a replacement radiator.
Measure power and ground under load where the design allows. Check requested fan speed against actual behavior on electronically controlled systems. A shroud cannot compensate for a motor that turns slowly or for a controller that never commands sufficient speed. Elecdura's fan control unit category illustrates why relay, resistor, PWM, and integrated-control versions must be diagnosed differently.
Several faults can produce the same overheating-at-idle complaint. Separate them before ordering parts.
A weak motor may start slowly, draw abnormal current, overheat, or fail at one commanded speed. A shroud bypass problem can exist with stable motor speed and current. Testing the electrical circuit under load distinguishes these directions. A complete wholesale cooling fan assembly may be justified when motor, blade, shroud, and controller have all aged together.
External blockage prevents air from crossing the fins. Internal restriction changes coolant flow and temperature distribution. Shroud recirculation reduces the amount of ambient air reaching an otherwise open core. These mechanisms need different tests and different replacement parts.
The ECU may limit or withhold fan operation because of a sensor, wiring, pressure-input, relay, or control-module problem. Review coolant-temperature and A/C pressure data. If the command is absent, repairing the shroud alone will not restore control.
Air trapped after cooling-system service and a thermostat that does not regulate flow can also produce unstable temperature. Confirm coolant level, bleeding procedure, hose-temperature behavior, and thermostat operation. The engine coolant thermostat range belongs to a separate fault path and should not be bundled into a fan diagnosis without evidence.
Finding | Preferred decision | Reason |
|---|---|---|
Cosmetic surface mark; geometry and mounts intact | Continue inspection; replacement may not be necessary | The mark does not prove airflow loss or structural weakness |
One serviceable seal or clip missing | Restore the specified seal or clip | The main shroud may remain structurally sound |
Cracked ring, motor-support arm, or multiple mounts | Replace the shroud or assembly | Alignment and stiffness cannot be trusted |
Blade contact plus motor or hub damage | Replace affected rotating parts and usually the assembly | Reusing damaged components risks imbalance and repeat contact |
Integrated controller overheated after mechanical drag | Correct the mechanical cause and test the controller/motor | Replacing electronics alone can lead to another failure |
The service boundary should follow structural condition and component design, not the lowest initial price.
A complete replacement is the safer choice when the ring is distorted, motor-support arms are cracked, several mounts are missing, blade contact has removed material, or heat-aged plastic breaks beside earlier repairs. Adhesive may close a visible crack without restoring concentricity or stiffness.
A separately supplied shroud can be reasonable if the motor, blade, wiring, resistor, and controller pass their checks and the design allows accurate transfer. Move every isolator, seal, harness retainer, and spacer to the correct location. After assembly, rotate the blade through a full revolution and recheck clearance under light mounting load.
Collision damage, blade contact, connector overheating, or advanced age can affect several parts at once. A complete fan module reduces the risk of combining the wrong blade pitch, rotation, motor depth, controller, or shroud ring. Use Elecdura's broader engine cooling product structure to keep the fan assembly distinct from radiator, thermostat, and electronic-control replacements.
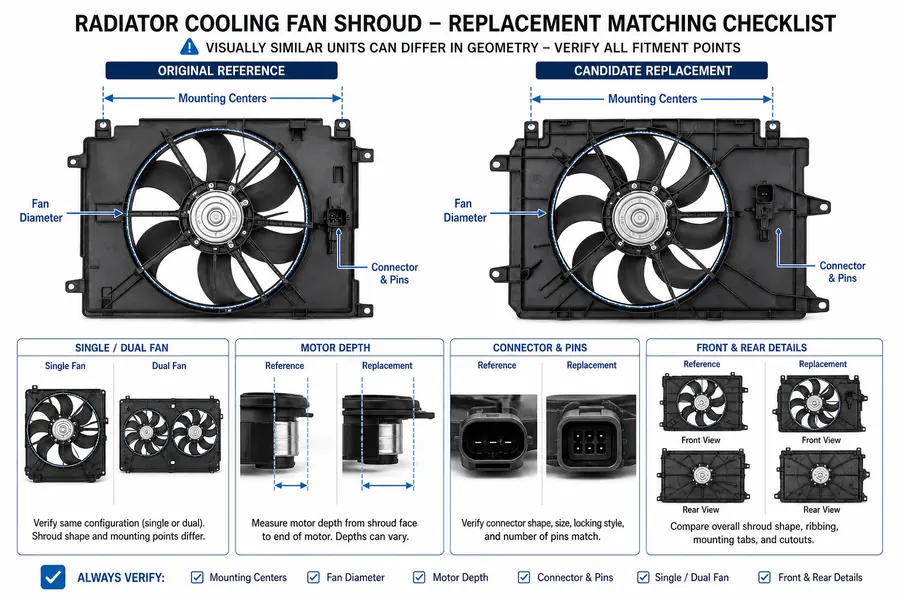
Outside shape is not enough. Start with the OE reference, vehicle application, and photographs, then confirm physical interfaces.
Record upper hooks, lower pins, side bolts, rubber isolators, and fixed center-to-center distances. Identify whether the shroud attaches to the radiator, condenser, front carrier, or a separate frame. Compare the thickness and position of the radiator-condenser stack.
Confirm single or dual fan, blade diameter, blade count, rotation direction, motor type, and hub depth. In a dual assembly, the two motors may use different connectors or power ratings. Do not reverse left and right positions because the physical housings look symmetrical.
Document brushed or brushless motor construction, connector keying, pin count, integrated resistor, and control module. Similar plugs may carry different control logic. Require verified application data rather than assuming interchangeability.
Engine size, transmission, towing package, A/C equipment, market specification, and body style can change airflow demand. Elecdura supports on-highway applications as well as off-highway applications, where debris exposure, vibration, stationary load, and packaging space create different requirements.
Transport can distort a fan shroud that passed production inspection. Check ring concentricity, motor-support stiffness, mounting distances, and connector retention against an approved sample. Packaging should support strong mounting points rather than load the ring or radial arms.
For a new aftermarket application, compare the sample directly with the original and confirm blade centering after installation. Record packaging orientation and inspect the first received batch for ring deformation, stressed mounts, loose hardware, and connector damage.
Yes, if the crack opens a bypass path or lets the ring and motor move out of alignment. The fan may still spin normally while pulling hot air around the radiator instead of ambient air through it. Confirm the idle-versus-road-speed pattern and inspect for gaps or movement before assigning the cause.
Look for normal fan command and speed, an open core face, visible bypass gaps, changing blade clearance, or contact marks. A small crack away from a mount or sealing edge may not materially affect cooling.
Road speed supplies ram air through the radiator. At idle, the fan and shroud must create forced airflow. The same pattern can also result from a weak motor, failed fan clutch, wrong control command, blocked fins, or low coolant flow, so the shroud should not be replaced without checking those branches.
It can be appropriate when the design is serviceable and the motor, blade, hub, wiring, and controller pass inspection. The replacement must reproduce motor depth, ring position, mounts, seals, and harness routing. Rotate the blade through a full revolution after assembly and verify clearance after all fasteners are tightened.
Provide the OE reference, vehicle model and year, engine and market version, single- or dual-fan layout, fan diameter, blade count, motor type, connector and pin photographs, controller or resistor details, fixed mounting measurements, and images of both sides of the original assembly.
Include the equipment model, engine application, radiator-pack configuration, operating voltage, duty environment, vibration or debris exposure, packaging requirement, target quantity, and any approved-sample inspection criteria.
For a wholesale quotation, send Elecdura's contact team the OE reference, vehicle model and year, engine and market version, required quantity, front-and-rear assembly photographs, fixed mounting-center measurements, fan diameter, blade count, motor depth, and clear connector-and-pin images. For dual-fan or controlled assemblies, also identify left/right motor positions and photograph the resistor or control module label. These product-specific records allow the proposed shroud or complete cooling fan assembly to be checked before sampling and bulk shipment.