English
Views: 0 Author: Site Editor Publish Time: 2026-09-14 Origin: Site
Opening temperature usually means the controlled point at which a thermostat first begins to open under a specified test. Full-stroke temperature is the later point at which the valve reaches a defined lift, not merely the moment it moves. The difference is designed operating range, not automatically a defect. Buyers should compare the complete temperature-lift curve, test method, valve travel, bypass action, housing, seals, and exact engine application.
This guide is for workshops, distributors, quality teams, and wholesale buyers. The decision affects the reliability of related parts such as the wholesale thermostat, engine thermostat, and radiator. It explains how to turn a marketing or chart claim into a repeatable technical decision without inventing universal limits.
Useful primary references for the method include HELLA thermostat technical brochure. They should be read in their stated scope; the exact vehicle, component, or customer specification remains controlling.
Start with component identity and the exact system specification.
The wax element expands gradually. In a controlled bath, the tester identifies when measurable valve movement begins according to the procedure. The stamped number may represent this nominal opening point, but tolerances and methods vary. Visual judgment in boiling water is not a precise substitute.
Ask the supplier to define start-to-open, heating rate, immersion, fluid agitation, measurement device, and tolerance. A result without method cannot settle a dispute of a few degrees.
A thermostat is fully open when it reaches the specified valve lift or stable maximum under the test definition. That temperature is normally higher than start-to-open. A catalog that lists only one number does not describe the flow area available at high load.
Request lift at one or more temperatures or a full curve. Compare valve diameter and effective flow path as well as millimeters of movement.
On cooling, the thermostat does not necessarily close at the same temperature at which it opened. Wax, springs, seals, friction, thermal lag, and test rate create hysteresis. This can be normal within design limits.
A repeatable test should record both heating and cooling cycles where relevant. Do not label every offset a stuck thermostat without comparing the specified curve and method.
If bath temperature rises too quickly, the fluid thermometer may run ahead of the wax element and metal body. Poor circulation creates local temperature differences. The observed opening point can therefore shift with procedure.
Use controlled heating, adequate soak, calibrated sensors, and uniform agitation. Position the thermostat so it is fully exposed without contacting a hot vessel surface.
Flow also depends on valve diameter, seat, cage, housing passage, bypass port, pump pressure, and circuit restriction. Two inserts with the same lift may create different effective area. Conversely, different lift can be correct for different geometry.
Approve the complete configuration rather than translating one lift number into a universal capacity claim. Engine thermal validation remains the final authority.
Measurements are useful only when the method and conditions are recorded.
Many engines use a bypass circuit while the main radiator path is closed. As the thermostat opens, a secondary disc or sleeve may close the bypass. Incorrect height, timing, or diameter can recirculate hot coolant and cause load overheating even when the main valve opens.
Measure the bypass feature and compare it with the housing. An insert that fits the recess can still be functionally wrong.
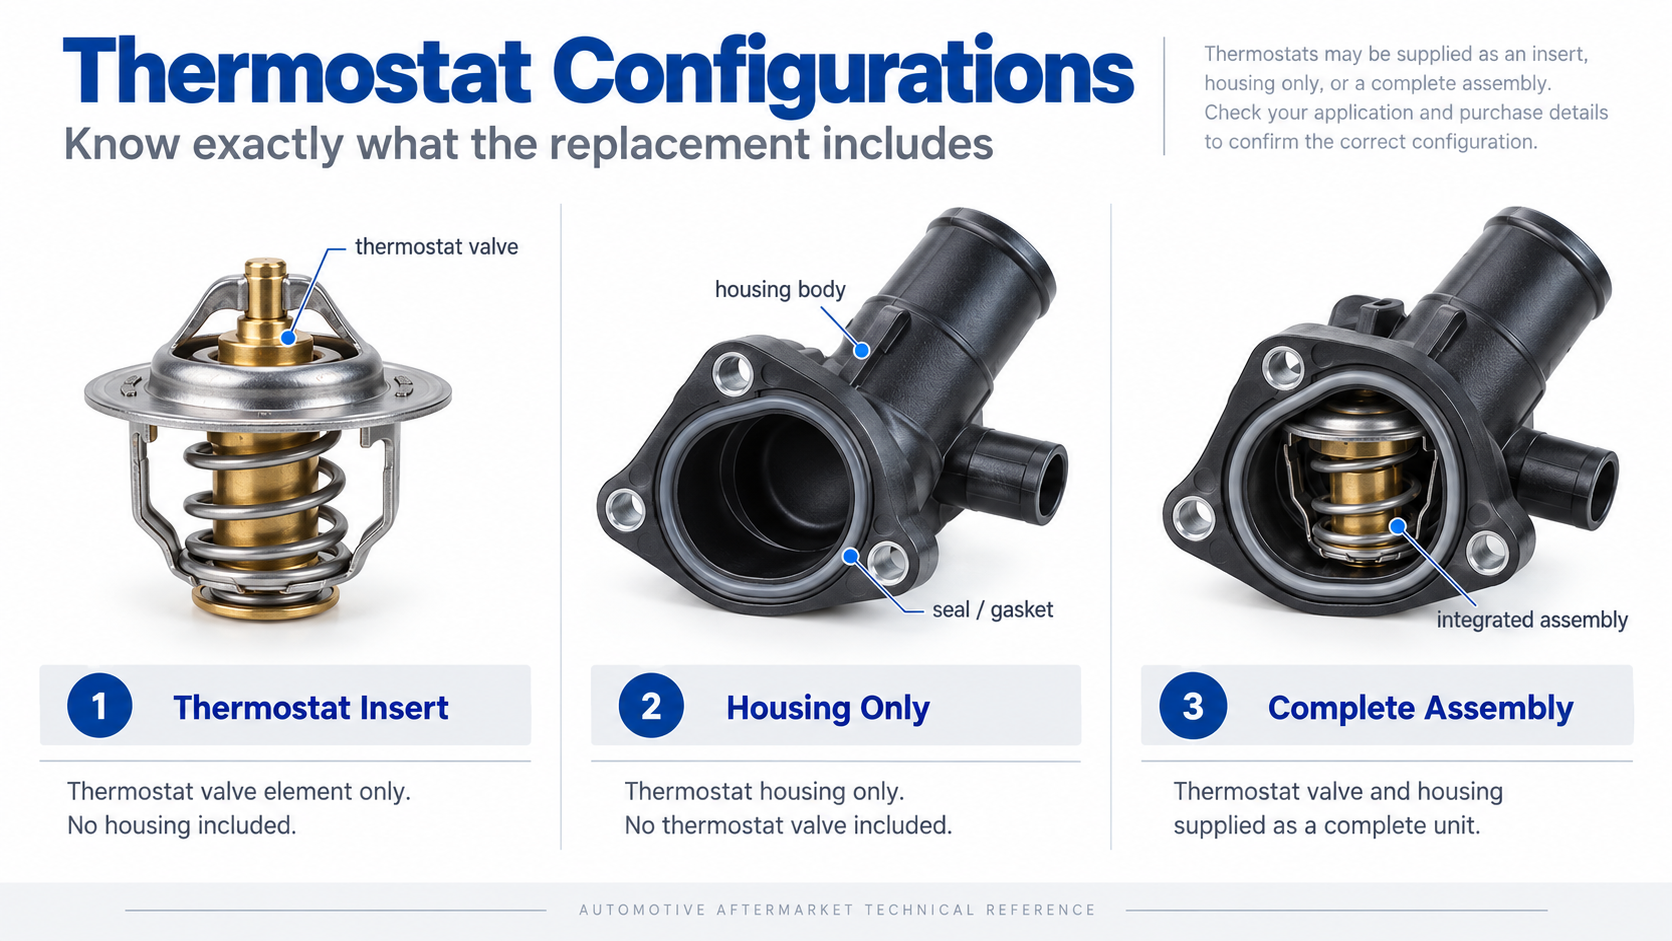
Modern thermostats may be supplied inside plastic or metal housings with sensors, heaters, bleed features, multiple outlets, seals, and quick connectors. Warpage, molding, connector keys, bolt sleeves, and hose angles affect fit and leakage.
Identify whether the quotation includes a complete assembly or only an insert. Photograph every interface and use controlled datums for sample approval.
An ECU-controlled heater can shift thermal behavior under load. Mechanical start-to-open remains important, but heater resistance, power, connector, insulation, and control strategy also matter. A passive housing that looks identical may trigger faults or change engine temperature.
Do not energize the heater outside its specified test. Use the vehicle diagnostic procedure and supplier electrical limits.
A correct thermostat can leak when an old, wrong, twisted, dry, chemically swollen, or pinched seal is used. Corroded mating surfaces, wrong torque, and trapped air can create symptoms blamed on opening temperature.
Confirm included seals, material, lubricant if specified, bolt sequence, filling and bleeding. Preserve the returned part and installation evidence before heating it on a bench.
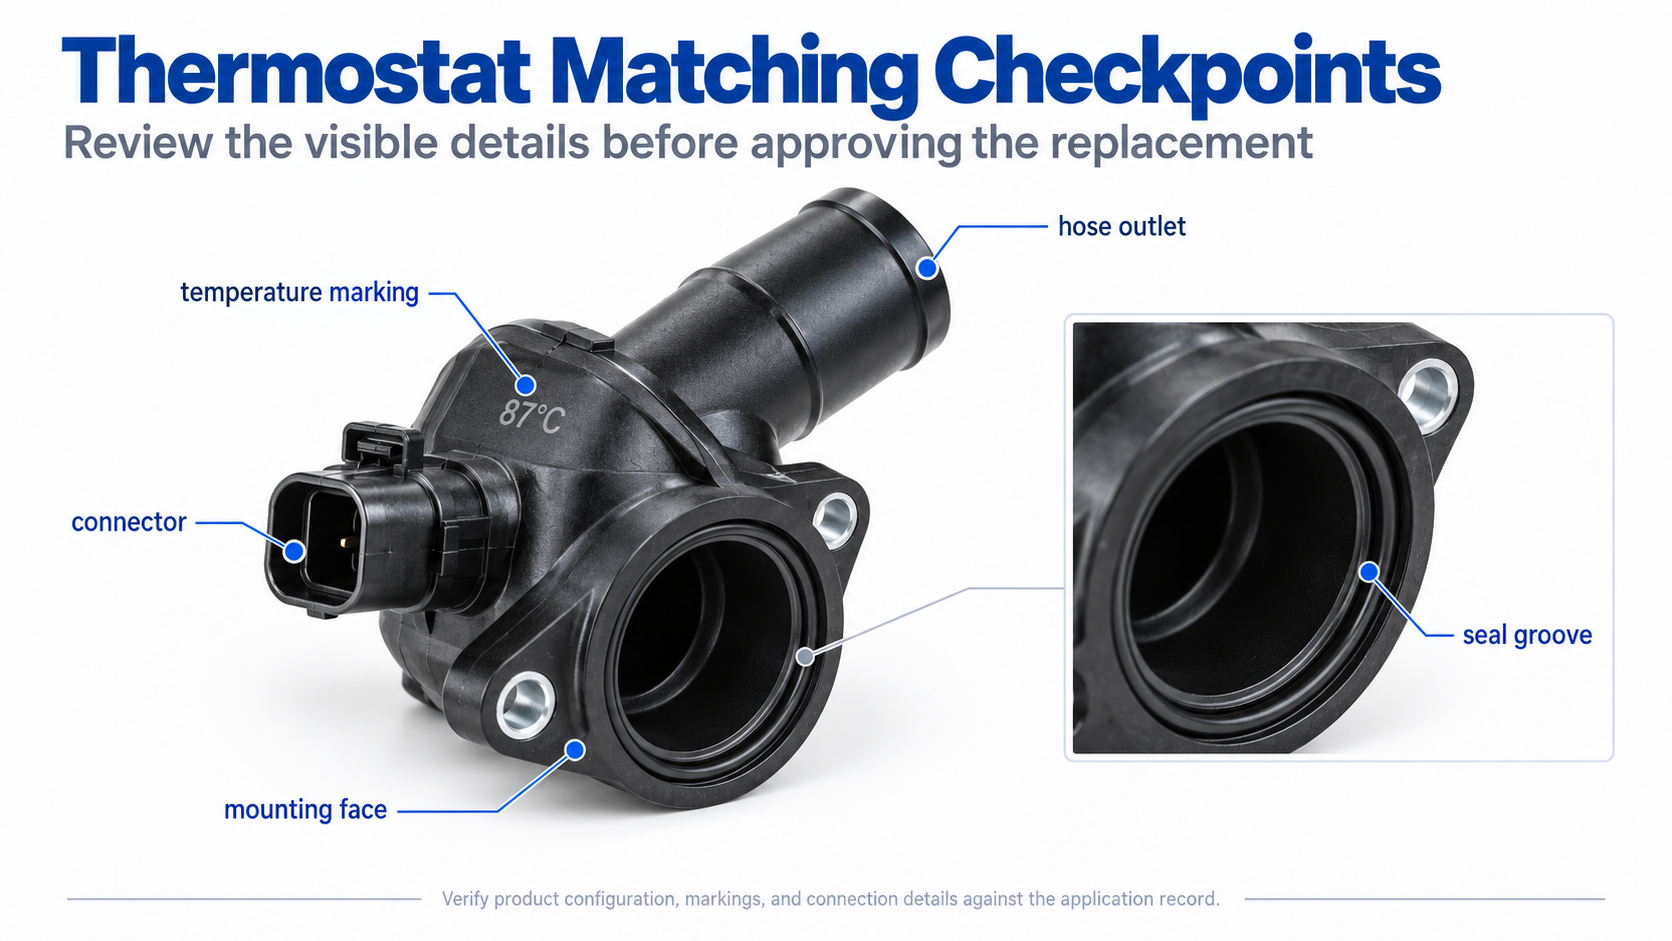
Model names span engines, markets, emissions packages, and production breaks. Use VIN range, engine code, OE number, temperature marking, connector, outlets, bypass, and dimensions together. Cross-references are candidates until the supplier confirms them.
Catalog teams should store restriction notes. Removing an engine-code or VIN exception to simplify a listing increases wrong-part sales.
Evidence group | Record | Why it matters |
|---|---|---|
Identity | Vehicle or machine, component numbers, revision, batch, labels | Prevents evidence from one configuration being applied to another |
Source | Publisher, document, date, revision, page or table | Makes the decision auditable when data changes |
Method | Fixture, instruments, calibration, conditioning, procedure | Separates real comparison from an uncontrolled demonstration |
Conditions | Temperatures, flows, voltage, pressure, time, fluid, control command | Allows results to be reproduced and compared |
Result | Raw readings, calculated values, observations, uncertainty | Shows what was measured rather than only pass or fail |
Acceptance | Requirement source, limit, disposition, approver | Stops limits being invented after a result is known |
Change control | Material, process, plant, tooling, firmware, packaging | Protects repeat orders after initial approval |
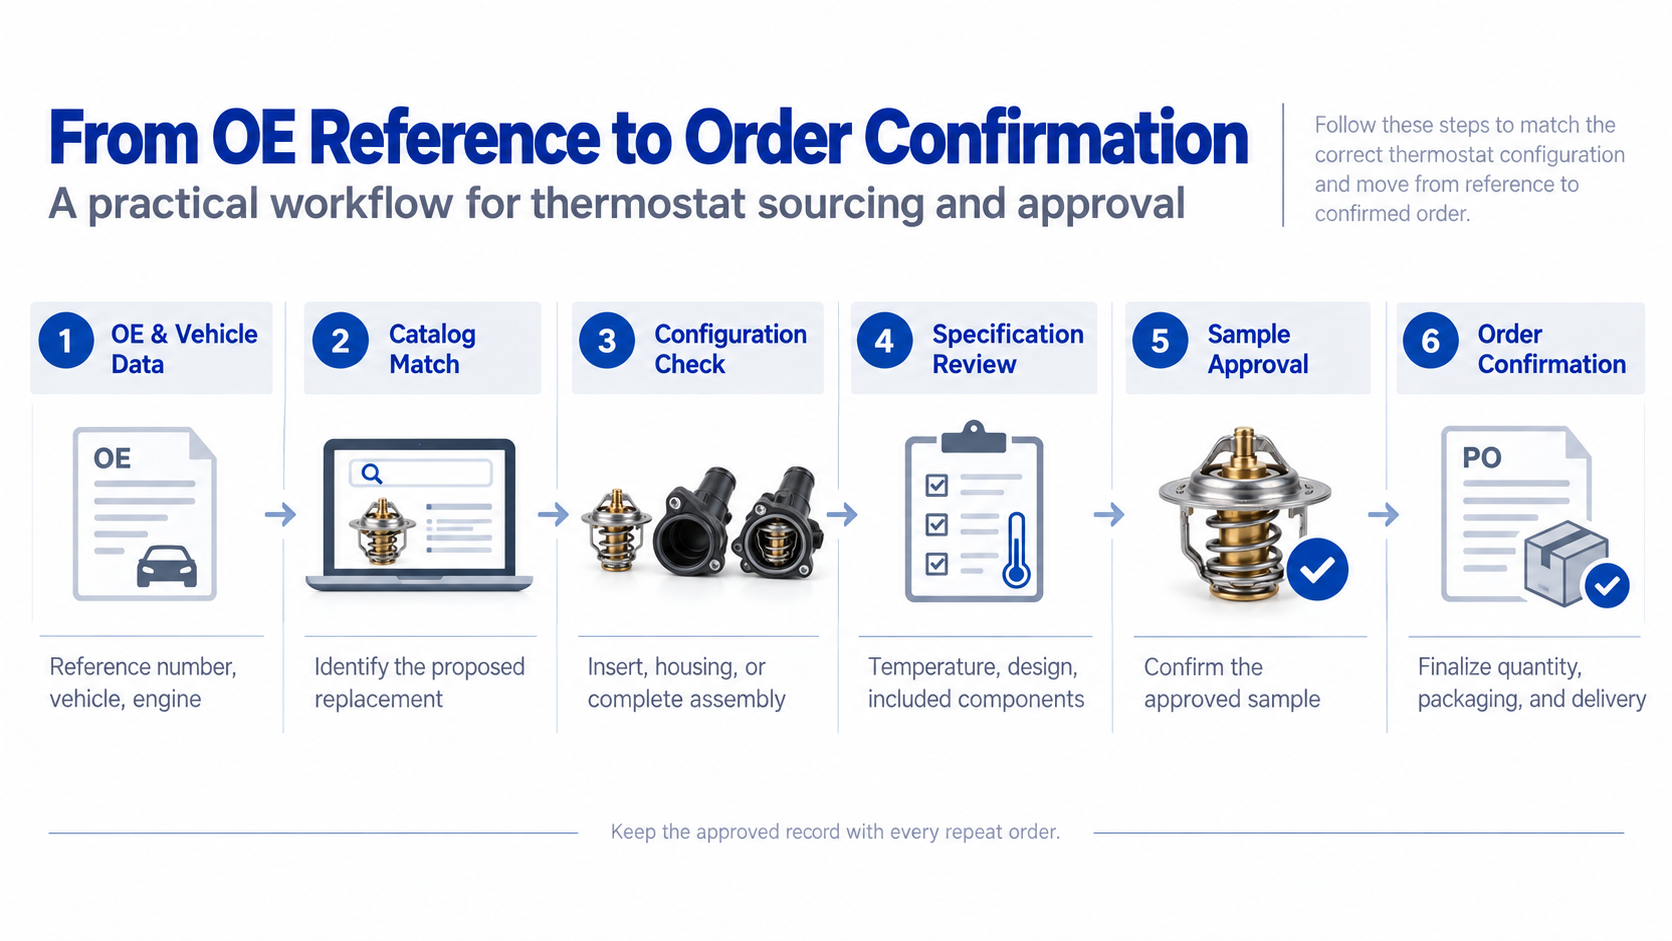
Identify vehicle, VIN or production range, engine code, OE number, and the removed configuration.
Record the marked temperature and whether it denotes start-to-open under the supplier's convention.
Obtain the temperature-lift specification, tolerances, and test method.
Compare insert diameter, flange, height, valve, spring, bleed, and bypass geometry.
For housings, compare mounts, outlets, seals, sensors, heater, and connector.
Condition samples and use a controlled, agitated bath with calibrated temperature and lift measurement.
Run repeated heating and cooling cycles and record curves.
Complete pressure or leak tests for housings and verify electrical data where applicable.
Install a sample with correct filling and bleeding, then observe engine data under defined warm-up and load.
Approve the drawing, thermal curve, seals, traceability, packaging, and change-control plan.
The workflow deliberately separates identification, bench evidence, and installed-system confirmation. A component can pass one layer and fail another. Record deviations instead of quietly adjusting the setup until a sample passes. If the product or application changes, decide which approvals must be repeated.
Retain labels, test records, and batch evidence for approval and warranty review.
State the approved component identity, application scope, controlled technical properties, test methods, sampling, records, packaging, shelf or storage controls where relevant, labeling, warranty evidence, and change notification. Classify requirements as mandatory, informational, or subject to sample approval. This prevents a supplier from treating every data request as an acceptance limit.
For private-label programs, link the sales part number to the actual manufacturer and revision. Require written notice before changes to critical material, geometry, formulation, motor or controller, tooling, plant, sub-supplier, test method, or packaging. Keep a retained sample or complete golden-sample record and periodically compare production data.
Price should be evaluated after technical alignment. Include failure investigation, returns handling, documentation, lead time, packaging damage, and field labor in total cost. An apparently cheaper product is not cheaper when its identity or evidence is ambiguous.
Treating the stamped value as full-open temperature
Using uncontrolled boiling water as a precision test
Comparing results with different heating rates
Ignoring bypass-disc geometry
Matching by outer diameter only
Replacing a map-controlled unit with a passive look-alike
Reusing a damaged seal
Condemning the thermostat before checking bleeding, sensors, fans, and coolant flow
Most of these mistakes share one cause: a convenient proxy is substituted for the real requirement. A label, one reading, or a physical resemblance can narrow the search, but it cannot prove the complete application. Use stop rules when information conflicts or when a safety-critical condition is not understood.
Do not immediately adjust the approved specification or replace the same component again. Reconfirm identity, installation, fluid or electrical preparation, airflow, contamination, connectors, hoses, sensors, controls, and the original failure cause. Compare the observed symptom with the pre-installation and commissioning records. A system-level fault can make a correct new component appear defective.
Preserve evidence before disassembly: labels, fault codes, operating conditions, pressures, temperatures, voltage, current, sound or vibration, leakage location, recovered fluid, and photographs. Stop operation when continuing could create damage or safety risk. Follow the vehicle or equipment maker's procedure and the supplier's warranty instructions.
There is no universal difference. It depends on element, spring, valve geometry, lift requirement, and test method. Use the supplier or vehicle specification.
Usually it refers to nominal start-to-open, but marking conventions vary. Confirm the product specification instead of assuming.
No. Lift, bypass action, housing, seal, connector, heater, outlets, and engine application may differ.
Possible causes include wrong fitment, insufficient lift, bypass mismatch, trapped air, low coolant, pump or radiator problems, fan faults, combustion leakage, or installation error.
Provide vehicle and engine data, old and new part labels, installation photos, coolant and bleeding record, scan temperatures, thermal test method and curve, seals, and returned-part condition.
Use a vessel, fluid, heater, agitation, calibrated temperature sensor, support fixture, and lift measurement suitable for the product. The thermostat must not touch the heater or wall. Position the temperature sensor to represent fluid around the wax element without obstructing movement. Keep an electrical connector dry unless the qualified procedure explicitly calls for an energized test.
Condition the thermostat as specified and begin below the expected opening region. Increase temperature at the controlled rate with uniform circulation. Record temperature and valve lift at regular intervals, with closer observations near start-to-open. Define the measurable movement used to identify opening. Continue until specified lift or stable maximum, then follow the controlled cooling path if closing and hysteresis are required.
Run more than one cycle when evaluating consistency. Wax elements and seals may settle, and a hurried observation can mislead. Test an approved reference in the same setup. Record sensor and gauge identity, calibration, fluid, heating rate, orientation, cycle, opening point, curve, full-stroke criterion, closing behavior, and any sticking or leakage.
For a complete housing, testing may need a custom fixture so outlets, bypass features, and seals are represented. A separate pressure or leak test can evaluate housing joints. Do not block a vent or bypass casually; the fixture can change forces and thermal response. Align the method before using results for rejection.
Two inserts carry an 88°C marking and fit the same recess. Sample A begins opening within its specified band, reaches required lift at the defined higher temperature, and its secondary disc closes the bypass passage at the intended travel. Sample B also begins near 88°C but has shorter travel and a secondary disc positioned differently. A cup-of-water demonstration would call both correct.
In the engine, Sample B can leave excessive bypass recirculation or restrict radiator flow at load. The engine warms normally and may pass an idle check, yet temperature rises on a grade or while towing. Opening temperature alone cannot explain the failure. Engine-code mapping, dimensional control, lift curve, and bypass geometry expose the difference before field returns.
A third unit may contain the correct insert inside a housing whose outlet is clocked differently. Its thermal test passes, but the hose contacts another component after installation. Thermal, mechanical, electrical, and application approval must remain separate gates.
Record vehicle, engine, VIN or production range, mileage, complaint, fault codes, scan temperatures, load conditions, coolant, recent work, and whether the issue is slow warm-up, overheating, leakage, or a diagnostic fault. Photograph installed orientation, connector, hose routing, housing, label, seal, and residue before removal.
Inspect for a displaced or swollen seal, wrong gasket, corrosion, debris, impact, cracked housing, overheated plastic, connector damage, and tool marks. Check the system for trapped air, low coolant, radiator restriction, pump or belt condition, fan operation, sensor plausibility, cap function, and combustion leakage as appropriate.
Preserve the part according to the investigation method and avoid scraping deposits away. If bench testing is authorized, record as-received condition before cleaning. Compare with an approved reference using the same method. A unit stuck by debris may reveal a cleanliness problem; cleaning before documentation destroys that evidence.
Store OE number and supersessions, market, VIN or production break, engine code, nominal start-to-open convention, full-stroke or lift data, insert or housing scope, connector and heater data, bypass geometry, bleed feature, included seals, and installation notes. Use photographs that show connector, outlets, flange, bypass, and marking.
Require review when wax element, spring, valve, seal, housing material, heater, sensor, mold, plant, or sub-supplier changes. A sales number can remain unchanged while thermal or fitment behavior moves. Periodic curve testing and dimensional audits protect the approved range.
Place reference and candidate temperature-lift curves on the same axes and use the same heating rate, orientation, fluid, sensor location, and definition of initial movement. Compare nominal opening, tolerance, slope, lift at selected temperatures, full-stroke criterion, maximum lift, closing path, and repeat-cycle variation. Add bypass-disc travel when the housing uses one.
Do not force the candidate to copy every point if the engine-approved specification permits another curve; likewise, do not approve it because one marked temperature matches. The decision should link the curve to coolant-flow needs, warm-up, emissions strategy, heater performance, load cooling, and ECU control. Production capability across multiple samples is more informative than one perfect prototype.
Opening temperature usually means the controlled point at which a thermostat first begins to open under a specified test. Full-stroke temperature is the later point at which the valve reaches a defined lift, not merely the moment it moves. The difference is designed operating range, not automatically a defect. Buyers should compare the complete temperature-lift curve, test method, valve travel, bypass action, housing, seals, and exact engine application. Build the decision around identifiable parts, comparable conditions, controlled methods, and retained evidence. That approach reduces wrong-part returns and gives suppliers a fair, reproducible target.
For wholesale matching, send Elecdura the part numbers, complete application, labels, photographs, required quantity, destination, and the technical evidence already available. Clear inputs shorten the route from candidate to approved sample and protect every repeat order.
For distributor training, show sales and warranty teams an insert, empty housing, and complete controlled housing together. Teach them to ask for engine code, marking, connector, outlet, bypass, and seal photographs. That short intake prevents the most common error: treating every part called an 88-degree thermostat as the same product.