English
Views: 0 Author: Site Editor Publish Time: 2026-08-10 Origin: Site
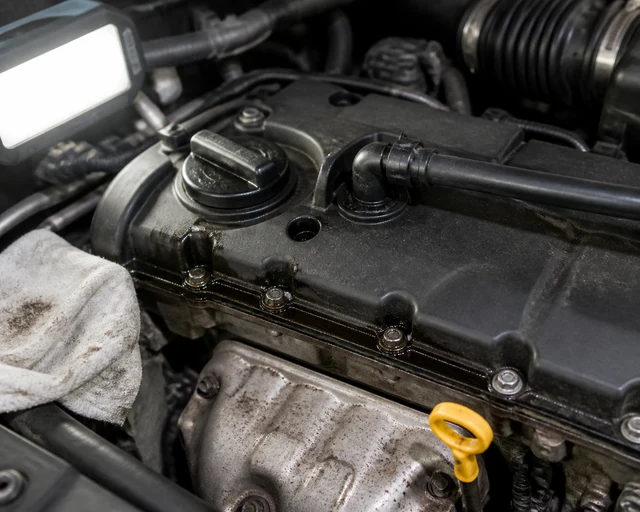
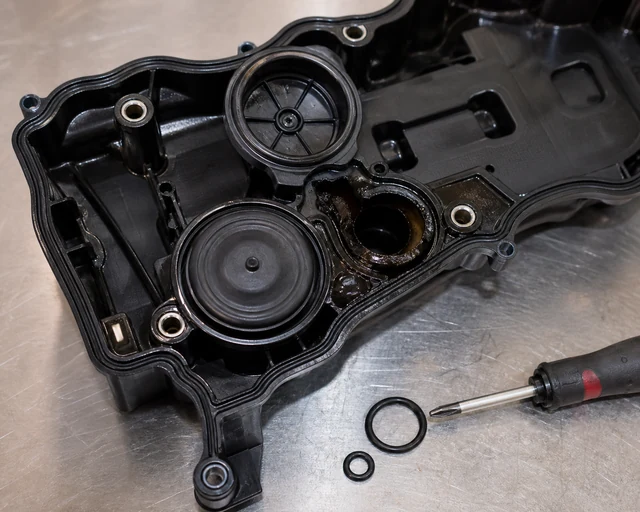
A failed valve cover PCV diaphragm can cause whistling, rough idle, lean codes, oil leaks, excessive crankcase vacuum, oil consumption, smoke, and repeated gasket seepage. On many modern engines, the valve cover is not just a cover. It may contain a pressure-regulating diaphragm, oil separator, breather passages, hose connections, and gasket channel. If the diaphragm tears or sticks, the engine can develop symptoms that look like an intake leak, bad valve cover gasket, or sensor problem.
This article explains valve cover PCV diaphragm symptoms, how to check crankcase vacuum and breather behavior, when the complete valve cover should be replaced, and what buyers should confirm before ordering. It is written for repair shops, distributors, fleet maintenance teams, and importers that need more accurate diagnosis and parts matching. Elecdura supports engine valve covers, thermostats, radiators, and related cooling and A/C replacement parts for wholesale buyers.
Symptom | Why It Happens | First Check |
|---|---|---|
Whistling noise | Air is pulled through a torn diaphragm or small leak | Listen near PCV cap and breather ports |
Rough idle or lean codes | Unmetered air enters through the breather system | Fuel trims and smoke/vacuum test |
Oil leaks | Crankcase pressure or vacuum regulation is wrong | Inspect gasket, cap, hoses, and crankcase vacuum |
Oil consumption or smoke | Oil mist is pulled into the intake | Inspect intake tract and PCV path |
Repeat gasket failure | Underlying breather fault remains unresolved | Check diaphragm before replacing gasket only |
The PCV system controls crankcase ventilation. Combustion gases that pass the piston rings must be drawn from the crankcase and routed into the intake in a controlled way. The diaphragm helps regulate vacuum so the crankcase is not exposed to too much suction or pressure. In many modern valve covers, this diaphragm is built into the cover assembly.
If the diaphragm tears, the engine may pull too much air through the crankcase or may lose proper pressure control. If it sticks or clogs, pressure may build and push oil past seals or gaskets. The symptom depends on the failure mode and engine design. This is why a valve cover PCV complaint should be diagnosed by behavior, not only by visible oil.
A high-pitched whistle is one of the most recognizable symptoms. It may come from the valve cover diaphragm area, oil filler cap, dipstick tube, or breather hose. The noise often changes when the oil cap is loosened. If the engine has excessive crankcase vacuum, removing the oil cap may be difficult or may cause idle change.
Do not use the oil cap test as the only diagnosis. Some vacuum is normal. The useful question is whether vacuum is excessive for that engine and whether the diaphragm area is leaking. A smoke test, vacuum gauge, or manufacturer test procedure can provide better evidence. A torn diaphragm can make the engine behave like it has an intake leak.
A failed PCV diaphragm can create unmetered air entry. The engine control module may add fuel to compensate, and fuel trims may rise. The vehicle may idle roughly, stall, hesitate, or set lean mixture codes. Because the symptoms overlap with intake manifold leaks, vacuum hose leaks, mass airflow sensor problems, and throttle body issues, the PCV system should be checked before parts are replaced randomly.
For repair shops, compare fuel trims at idle and higher rpm. A smoke test can help find leaks around the valve cover, diaphragm cap, breather hoses, and intake connections. If smoke exits the diaphragm area or a hose port, the valve cover or related breather part may be the correct repair.
Oil leaks around the valve cover gasket may be caused by gasket aging, but pressure-control faults can make leakage worse. If crankcase pressure rises because the PCV path is blocked, oil may be pushed past gaskets and seals. If excessive vacuum distorts seals or pulls oil into the intake, the customer may see oil consumption or smoke. Replacing the gasket alone can fail if the diaphragm problem remains.
Inspect the entire valve cover assembly. Look at gasket edges, breather hoses, oil filler cap, PCV cap, and intake pipe oil traces. If the cover is warped or the diaphragm is integrated and failed, a complete valve cover assembly may be more reliable than a gasket-only repair.
Confirm symptoms: whistling, rough idle, oil leak, smoke, oil consumption, or lean codes.
Inspect breather hoses, valve cover body, oil cap, and gasket area.
Check fuel trims and idle behavior with a scan tool.
Listen for whistle near the diaphragm area and note whether it changes with oil cap movement.
Measure crankcase vacuum if the service procedure provides a specification.
Use smoke testing to check for leaks in the valve cover and breather path.
Inspect the intake tract for oil that may indicate excessive oil carryover.
Compare old and new valve cover features before replacement.
A complete valve cover should be considered when the PCV diaphragm is integrated and not serviceable, the cover is warped, breather passages are damaged, hose ports are cracked, or the gasket groove is distorted. Some aftermarket kits may offer diaphragm repair, but that is not suitable for every design or every customer. Professional repair networks often prefer a complete cover when labor is high and the integrated breather function must be restored reliably.
A gasket-only repair may be acceptable when the diaphragm is healthy, the cover is flat, and the leak is clearly from an aged gasket. The repairer should still inspect crankcase ventilation because a repeated oil leak can indicate pressure imbalance. Choosing gasket or complete cover should be based on diagnosis, not only part price.
Valve covers vary by engine code, production date, PCV design, breather hose angle, oil cap type, gasket shape, bolt sleeve, and sensor or vacuum port provision. A visually similar cover may not match the original breather routing. If the hose angle or port diameter is wrong, installation may be delayed or the hose may be stressed.
Buyers should request OE number, engine code, top photo, underside photo, PCV diaphragm close-up, breather port photos, gasket view, and included hardware details. If the cover includes a gasket, confirm whether it is pre-installed or packed separately. If bolts or grommets are required, confirm inclusion before ordering.
A good valve cover supplier should control plastic quality, sealing surface flatness, gasket material, diaphragm response, port strength, and packaging. Plastic hose nipples and bolt ears can crack during shipping if the carton is weak. Gaskets can deform if compressed incorrectly. A diaphragm with poor material can fail early and create the same symptoms again.
For sample approval, inspect the cover for flatness, clean molding, strong ports, accurate gasket groove, and correct PCV cap design. If possible, compare vacuum behavior or diaphragm movement against a known-good part. For bulk orders, keep approved sample photos and compare future shipments.
Warranty claims should include the symptom, old and new part photos, fuel trim data if relevant, smoke-test or vacuum evidence, installation photos, and whether breather hoses were inspected. If a customer says the new cover still leaks, check whether crankcase pressure is still abnormal, whether the gasket was pinched, and whether the cover was tightened correctly.
If multiple covers fail with whistling or diaphragm symptoms, review diaphragm material and supplier testing. If claims are mostly oil leaks after installation, review gasket fit, torque procedure, surface cleanliness, and packaging. Separating failure modes helps buyers improve the product line.
Confirm OE number, engine code, vehicle model, and production date range.
Check whether the PCV diaphragm is integrated or serviceable.
Compare top, underside, breather port, gasket groove, and oil cap photos.
Confirm gasket, bolts, grommets, oil cap, and hose fittings included.
Inspect plastic quality, port strength, sealing rail, and diaphragm area.
Request packaging that protects hose nipples and bolt ears.
Record warranty evidence by symptom: whistle, rough idle, oil leak, oil consumption, or gasket failure.
Observation | Likely Direction | What to Confirm |
|---|---|---|
Whistle changes when oil cap is loosened | PCV diaphragm or crankcase vacuum issue | Vacuum level and diaphragm area leak |
Oil leak only at gasket edge, no vacuum symptoms | Gasket or warped cover | Cover flatness and gasket groove |
Lean codes with smoke near valve cover | Breather leak or diaphragm tear | Smoke test and fuel trims |
Oil in intake pipe | Oil separation or PCV regulation issue | Breather path and oil carryover |
Leak returns after gasket replacement | Pressure control, warped cover, or installation issue | Crankcase pressure and torque procedure |
This table helps repairers avoid replacing the visible gasket while ignoring the pressure-control fault. It also helps parts sellers ask better questions before shipping a valve cover. A customer who reports whistling and rough idle may need a PCV-integrated cover. A customer with a simple external leak may need a gasket or complete cover depending on flatness and cover condition.
Example one: a turbocharged gasoline engine has a loud whistle and lean codes at idle. The oil cap is difficult to lift, and smoke testing shows leakage around the diaphragm cap. The valve cover PCV diaphragm is the likely repair direction. Replacing only the gasket would not solve the air leak.
Example two: a vehicle has oil seepage around the valve cover after high mileage, but fuel trims are normal and no whistle is present. The cover is flat and the diaphragm tests normally. A gasket repair may be enough if the sealing surface is clean and the torque procedure is followed.
Example three: a new gasket leaks again within a few weeks. Inspection shows excessive crankcase pressure from a blocked breather hose. The gasket was not the root cause. The hose and PCV path must be corrected before another gasket or cover is installed.
Customers often understand oil leaks but may not understand why a valve cover can affect idle quality. A clear explanation is that the valve cover may include the engine's crankcase ventilation regulator. When that regulator fails, the engine can pull in unmetered air or build pressure that pushes oil past seals. The repair is therefore not only cosmetic; it affects engine breathing.
For workshops, this explanation makes the complete cover recommendation easier to justify. It also prevents customers from assuming a lower-cost gasket-only repair is always equivalent. The invoice should describe whether the repair addressed a gasket leak, PCV diaphragm failure, warped cover, or broken breather port.
Inspect breather hoses, intake hose connections, oil filler cap, dipstick tube seal, intake manifold ports, and any separate PCV valve or separator. If these parts are brittle, cracked, blocked, or oil-soaked, a new valve cover may not solve the entire problem. On some engines, the intake manifold and valve cover PCV system interact closely, so smoke testing both areas is sensible.
Also inspect ignition coils and spark plug wells if oil has leaked into them. Oil contamination can cause misfires or damage boots. If the valve cover leak has been present for a long time, cleaning and related inspection should be included in the repair plan.
Valve cover PCV assemblies should be stocked by engine family and OE reference, not by broad model name alone. A single vehicle model may use different covers across engines or production dates. A distributor should separate covers with different breather port angles, PCV cap designs, gasket shapes, and oil filler positions. Similar-looking covers should have photo labels in the warehouse.
Fast-moving applications with integrated PCV diaphragms deserve better supplier vetting because failure creates both leak and drivability complaints. If a low-cost cover has poor diaphragm material, claims may appear as whistling, rough idle, or lean codes rather than obvious physical breakage. Track claims by symptom so the quality issue can be identified.
A complete quotation should include OE reference, engine code coverage, material, included gasket, PCV diaphragm status, breather port layout, oil cap inclusion, bolt or grommet inclusion, packaging method, carton quantity, minimum order quantity, and warranty terms. If the supplier says the diaphragm is included, request a close-up photo. If the supplier sells only the cover shell, state that clearly.
For buyers comparing prices, kit contents are critical. One supplier may include gasket, oil cap, and grommets. Another may include only the cover. A third may include a different diaphragm design. The cheapest quote may not be the cheapest installed repair. Compare complete repair value, not just the plastic part.
Clean the cylinder head sealing surface carefully and remove old gasket material. Check that the gasket sits correctly in the groove. Follow the correct torque sequence and specification. Do not overtighten plastic covers because distortion can create leaks. Make sure breather hoses are seated and not cracked during reconnection.
After installation, verify idle behavior, listen for whistle, check for leaks after warm-up, and recheck oil or coolant contamination only if the engine design makes that relevant. A short post-repair check prevents a customer from returning with a hose left loose or a gasket pinched during installation.
Classify claims by symptom. Whistling and lean codes suggest diaphragm or air leak. External oil seepage suggests gasket, cover flatness, or installation. Broken ports may suggest shipping damage or rough installation. Oil consumption may suggest diaphragm, oil separator, or engine wear. Classification helps the distributor decide whether the issue is supplier quality, packaging, catalog fitment, or diagnostic error.
Ask for photos and test evidence before replacing stock. If the same failure repeats across a batch, quarantine inventory and compare with the approved sample. If claims cluster around one engine application, review fitment data and installation notes. Good claim data turns a messy category into a manageable product line.
Useful product photos should show the top of the cover, underside gasket channel, PCV diaphragm cap, breather ports, oil cap area, bolt sleeves, connector or sensor provisions if present, and packaging. A single beauty shot from the top does not show enough for a technical buyer. The underside photo is especially important because gasket shape and oil-separation passages often decide fitment.
For online sales and B2B catalogs, include alt text and labels that describe the actual part features. Customers comparing old and new covers need to see the ports and gasket shape. Better photos reduce pre-sale questions and post-sale returns.
Valve cover PCV diaphragm symptoms include whistling, rough idle, lean codes, oil leaks, oil consumption, smoke, and repeated gasket seepage. The diaphragm and breather system should be checked before replacing only the gasket or assuming the intake manifold is leaking. A complete valve cover may be required when the diaphragm is integrated, the cover is warped, or the breather ports are damaged.
When requesting a quotation, send the OE number, engine code, old valve cover photos, PCV area close-up, breather port views, gasket requirements, and included hardware needs. Elecdura can help buyers match valve covers and related replacement parts so the repair addresses crankcase ventilation, not only the visible oil leak.