English
Views: 0 Author: Site Editor Publish Time: 2026-08-10 Origin: Site
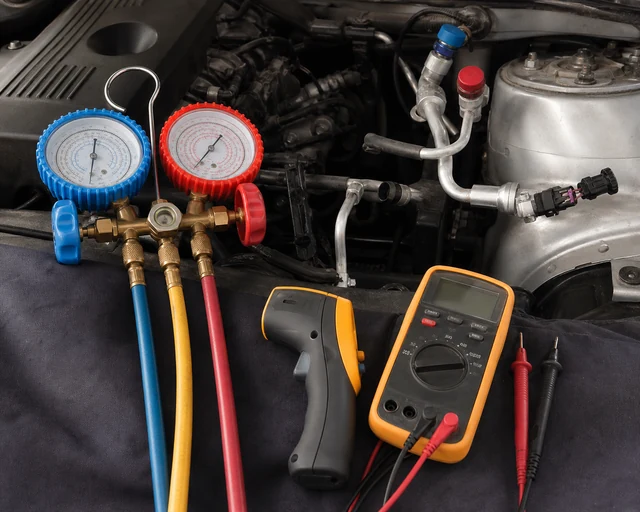
To check an automotive A/C pressure switch correctly, start by confirming the actual refrigerant pressure. Do not test the switch in isolation and assume it is bad because the compressor will not engage. A low-pressure switch may be open because the system is undercharged. A high-pressure switch may open because airflow is poor or the system is overcharged. A three-wire pressure sensor may report the wrong value because of wiring, reference voltage, ground, or signal problems. The fastest accurate diagnosis compares the switch or sensor reading with real system pressure.
This article gives a practical checking sequence for repair shops, fleet technicians, distributors, and parts buyers. It explains what to inspect first, how to separate a simple switch from a pressure transducer, when continuity testing is useful, when scan data is more useful, and what information should be confirmed before ordering a replacement. For related A/C repair parts, Elecdura supports wholesale A/C compressors, A/C condensers, radiator fans, and fan control modules.
A/C systems are pressurized, and refrigerant handling must follow local regulations and safe service procedures. A pressure switch is a small part, but it belongs to a sealed refrigerant circuit. Do not loosen a switch or sensor unless the design uses a service valve or the system has been properly recovered. Many vehicles have Schrader-style valves under certain switches, but not all do. Removing the wrong part under pressure can release refrigerant and oil.
Also avoid using jumper wires as a repair. A short bypass may help a qualified technician confirm circuit behavior, but it can also force a compressor to run when pressure is unsafe. If the system is empty, bypassing the low-pressure switch can damage the compressor. If the high side is excessive, bypassing protection can raise pressure further. Testing should reveal the cause, not defeat the protection.
Before testing, identify whether the vehicle uses a two-wire pressure switch, a trinary switch, or a three-wire pressure transducer. A two-wire switch usually opens or closes at a threshold. A trinary switch can include compressor protection and fan-control functions. A three-wire transducer sends a variable signal to a control module. These parts may all be called pressure switches in everyday conversation, but they are tested differently.
Device | Common Location | Basic Behavior | Main Test |
|---|---|---|---|
Low-pressure switch | Accumulator, suction line, or low side | Prevents compressor operation when pressure is too low | Continuity plus low-side pressure |
High-pressure switch | Discharge line, condenser, or receiver drier area | Stops compressor when high-side pressure is unsafe | Continuity plus high-side pressure |
Trinary switch | Receiver drier or high-side line | Combines pressure protection and fan signal | Pin function test and pressure behavior |
Pressure transducer | High-side line or condenser area | Sends a variable voltage pressure signal | Reference, ground, signal voltage, and scan data |
The testing path changes depending on the symptom. If the compressor never engages, the cause may be low charge, an open pressure switch, a clutch circuit problem, a blown fuse, or a module command issue. If the compressor short cycles, the cause may be low refrigerant, switch threshold behavior, icing, or an expansion-device problem. If cooling fails only at idle, the high side may be rising because the fan is weak or the condenser is blocked.
Write down the condition before touching parts. Does the A/C work when driving? Does it fail only on hot days? Does the fan run with A/C request? Does the compressor click on briefly and stop? Is there a stored pressure-sensor code? This record prevents the diagnosis from drifting toward the pressure switch simply because the switch is easy to see.
Look for signs of refrigerant oil at hose crimps, condenser corners, compressor body, service ports, evaporator drain, and around the pressure switch or sensor. A low-pressure switch that is open on an empty system is not defective; it is protecting the compressor. If the system has a visible leak, repair the leak and recharge correctly before judging the switch.
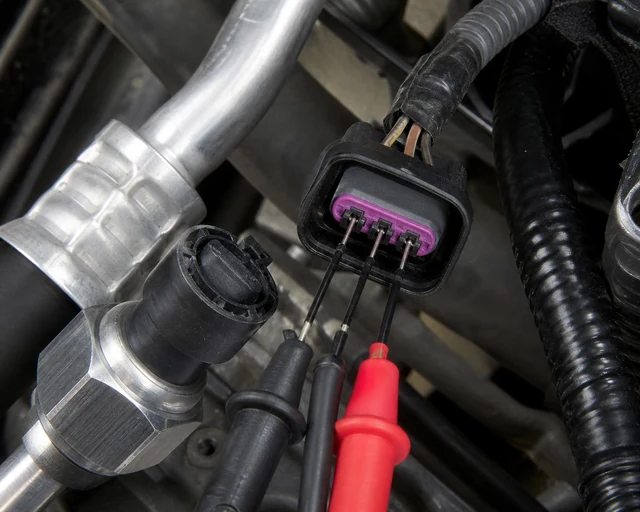
Inspect the connector carefully. Pressure sensors often sit near the front of the vehicle where heat, water, road splash, collision repair, and vibration can affect the harness. Look for broken lock tabs, green corrosion, oil intrusion, loose terminals, damaged wires, and previous repair splices. A replacement sensor will not fix a poor ground or spread terminal.
Static pressure means system pressure with the engine off and the system stabilized. It should broadly relate to ambient temperature for the refrigerant used. If static pressure is extremely low, the system may be undercharged or empty. In that case, a low-pressure switch open reading is expected. Testing continuity without knowing pressure can lead to a false diagnosis.
Use approved service equipment and compare the pressure to ambient conditions. If the pressure is near zero, perform leak diagnosis. If static pressure is plausible but the control module reads zero or an impossible value, focus on sensor signal and wiring. If pressure is unusually high before operation, check whether the system is overcharged, contaminated, or heat-soaked.
For a two-wire switch, disconnect the connector and test continuity across the switch only after verifying system pressure is in the expected range for that switch. Service information should confirm whether the switch should be open or closed at the measured pressure. Do not assume every switch uses the same logic. Some are normally closed within a safe pressure range, while others may be arranged differently depending on circuit design.
If the switch state does not match actual pressure and service information, the switch may be faulty. If the state does match pressure, the switch is likely working. For example, if low-side pressure is too low and the low-pressure switch is open, the correct diagnosis is not a bad switch. The correct direction is leak detection and recharge by weight after repair.
A three-wire pressure sensor should be checked with scan data and electrical measurements. Usually one wire supplies reference voltage, one is ground, and one is signal. Exact values vary by vehicle, so service information is required. If reference voltage is missing, the sensor cannot report correctly. If ground is poor, the signal may be skewed. If the signal wire is open or shorted, the module may show a fixed low or high pressure.
Compare scan-tool pressure to gauge pressure. If they move together reasonably, the sensor is probably reporting. If the gauge shows pressure but scan data remains fixed, jumps, or reads impossible values, test the circuit. Wiggle the connector while watching the signal. Many intermittent A/C complaints come from terminal contact rather than the pressure element itself.
High-pressure protection can be triggered by poor airflow. If the compressor engages and then cuts out at idle, watch the condenser fan. A weak fan, failed fan resistor, faulty fan module, blocked condenser face, or debris between the condenser and radiator can raise high-side pressure quickly. The pressure switch or sensor may shut the system down correctly.
This step is especially important in hot climates and for vehicles that cool better while driving. Road speed can mask a weak fan by pushing air through the condenser. At idle, the fan must do the work. If airflow is poor, replacing the pressure switch will not restore stable cooling. The repair direction may involve the fan motor, fan control module, relay, wiring, or condenser cleaning.
Replace the switch or sensor only when the evidence points to it. A two-wire switch may be replaced when actual pressure is within the expected safe range but switch continuity is wrong. A three-wire transducer may be replaced when reference and ground are correct, wiring is sound, and the signal does not match actual pressure. If pressure is outside the safe range, fix the cause of pressure first.
Before installation, compare the old and new parts. Check thread size, sealing method, O-ring, connector shape, pin count, mounting location, and part number. A visually similar sensor can have a different output curve. A switch with the wrong threshold can cause premature cutout or allow unsafe operation. For distributors, this is where correct procurement data reduces returns.
A workshop receives a vehicle with no compressor engagement. The technician jumps the low-pressure switch and the compressor clicks on, so the switch is blamed. But static pressure is very low, and the condenser has oily residue at one corner. The switch was open because the system had leaked down. Replacing the switch would not fix the vehicle and could encourage compressor operation without enough refrigerant and oil flow.
The correct process is to find the leak, repair the leak, recover any remaining refrigerant, evacuate, recharge by weight, then confirm compressor operation and vent temperature. After the charge is correct, the switch can be retested if the system still refuses to run. This sequence protects the compressor and prevents a good switch from being returned as defective.
A vehicle cools well on the road but blows warm at traffic lights. The high-side pressure rises quickly at idle, and the compressor is disabled. The pressure sensor is replaced, but the same symptom returns. The real issue is that the condenser fan does not reach high speed. At road speed, airflow is enough; at idle, pressure climbs.
The correct repair is to test the fan circuit, module, relay, resistor, fuse, and wiring. The condenser face should also be checked for blocked fins or debris. This example shows why pressure-switch diagnosis must include airflow. The pressure device may be the component that reports the problem, not the component that causes it.
Confirm whether the part is a switch, trinary switch, or pressure transducer.
Request OE number, vehicle application, mounting location, and refrigerant system information.
Compare connector shape, pin count, lock tab, thread, and sealing face.
Ask for O-ring inclusion and port cap protection.
Record pressure readings or scan data before accepting warranty claims.
Check whether related fan, condenser, compressor, or refrigerant-charge problems were ruled out.
Use photos of the old part and connector before approving a bulk order.
The first mistake is testing continuity without knowing system pressure. The second is bypassing the switch and assuming compressor engagement proves the switch is bad. The third is replacing a three-wire sensor without checking reference and ground. The fourth is ignoring fan operation when high-side pressure rises. The fifth is ordering by part appearance rather than OE number, connector, thread, and pressure specification.
These mistakes are common because the pressure switch is small and accessible. But A/C diagnosis is system diagnosis. The pressure device responds to refrigerant state, airflow, electrical command, and module logic. A disciplined test takes longer than a guess, but it prevents unnecessary compressor replacement and reduces warranty friction.
If the vehicle arrived after a recent compressor replacement, the first questions should be about refrigerant charge, flushing, condenser condition, and whether the pressure sensor was disturbed during the repair. A disconnected or damaged sensor near the condenser can prevent compressor command even though the new compressor is good. If the vehicle arrived after front-end collision repair, inspect the sensor harness, condenser port, and fan shroud area carefully because impact damage and harness stretching are common.
If the vehicle has an intermittent complaint, avoid testing only when the system is cold in the workshop. Heat, vibration, and fan load can reveal faults that are not present at first start. Monitor pressure signal, compressor command, and fan operation until the symptom appears. A pressure sensor that reads normally cold but drops out when hot may have internal failure or connector tension. A switch that opens only when high-side pressure climbs may be reacting to a real airflow problem.
Parts distributors often receive pressure switches returned with the note "A/C still does not work." That note is not enough to prove defect. A better claims form asks for the original fault, actual low-side and high-side readings, static pressure, scan-tool pressure value, connector condition, and whether refrigerant charge was verified. If the vehicle was empty, the switch should not be blamed. If high-side pressure was excessive, fan and condenser checks are required.
For wholesale programs, include a small technical note with pressure switches and sensors. The note can remind installers to verify system pressure and connector condition before replacement. This is not about avoiding responsibility; it is about helping repairers avoid wasted labor. When the same part number receives repeated claims, the collected evidence can show whether the issue is wrong application data, poor connector fit, incorrect pressure calibration, sealing leakage, or misdiagnosis in the field.
Before approving a new supplier, compare samples against known-good parts. Check connector fit with the mating plug, terminal alignment, thread quality, sealing surface, O-ring size, cap protection, and labeling. For pressure transducers, ask whether the supplier can provide voltage-output information or test records. For switches, ask about pressure threshold consistency. Even small calibration differences can affect compressor cycling and customer complaints.
Packaging should keep the threaded port clean and protected. Dust, metal particles, or damaged threads can create leaks during installation. If the part is sold to hot or dusty markets, port caps are especially important. For mixed shipments, separate similar high-side, low-side, and transducer parts clearly because warehouse picking errors are easy when small sensors look alike.
A pressure switch replacement may be only one part of a larger repair. If the compressor failed internally, the condenser may be contaminated and the receiver drier may need replacement. If high-side pressure is excessive at idle, the cooling fan or fan control module should be tested. If the system is low, leak points at the condenser, hose, evaporator, compressor shaft seal, and service ports should be checked. Replacing the pressure switch while ignoring these issues can lead to repeat failure.
For fleets and repair chains, build a decision rule: no pressure switch warranty approval without pressure evidence, no compressor warranty approval without charge and contamination evidence, and no high-pressure complaint approval without fan and airflow evidence. These rules make repairs more consistent and help purchasing teams identify which parts should be stocked together.
Field | What to Record | Why It Helps |
|---|---|---|
Complaint | No cooling, intermittent, idle-only, short cycling | Points to pressure, airflow, or command issue |
Static pressure | Reading with engine off and ambient temperature | Identifies low-charge situations |
Running pressure | Low and high side with fan status | Shows airflow or restriction problems |
Scan data | Reported pressure and compressor command | Confirms sensor/module interpretation |
Connector photo | Lock tab, pins, corrosion, wire condition | Finds circuit faults and matching errors |
Old part number | OE or supplier reference | Prevents wrong replacement selection |
A correct diagnosis does not always end with replacing the pressure switch. Sometimes it ends with repairing a leak, replacing a fan module, cleaning the condenser face, correcting refrigerant charge, repairing a connector, or replacing a pressure transducer. The pressure device should be replaced only when its output disagrees with the verified system condition or when it leaks physically at the port.
This approach is better for customers and for parts businesses. The repairer avoids repeat work, the distributor avoids unnecessary returns, and the vehicle owner gets a stable A/C system. A pressure switch is small, but testing it correctly requires the technician to understand the whole A/C circuit.
To check an automotive A/C pressure switch, identify the device type, confirm actual system pressure, inspect the connector, compare scan data to gauge readings, test continuity or voltage correctly, and check fan and condenser operation. If pressure is genuinely low or high, fix that cause first. If pressure is normal but the switch or sensor reports incorrectly, then replacement is justified.
For replacement sourcing, send the OE number, connector photo, thread photo, pin count, mounting location, and any pressure or voltage information. Elecdura can help distributors and repair networks match A/C pressure switches and related system parts so a low refrigerant problem, fan issue, or wiring fault does not become an unnecessary compressor replacement.